![]()
Tutorial 2 : Object groups. Move - Modify -Duplicate
(1) Please, load the file created during tutorial
1.
Double-click the "track", it is now shown in the "notes
editor". Please, notice that now it's framed
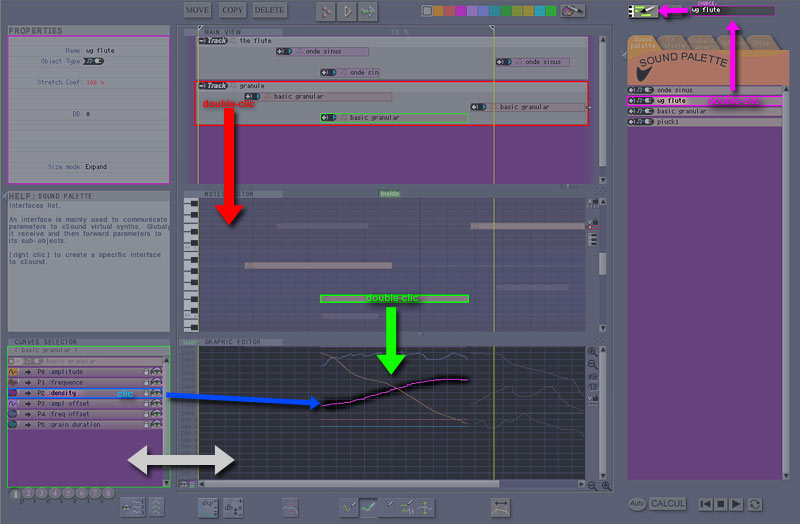
red.
In a general way double-click activates or deactivates an object, the
frame colour of an object defines its use:
- RED the object is shown
in "notes editor".
- GREEN the object is shown
in the « graphic editor » and the « curves selector
».
- BLUE, to draw only on
this curve. (One mouse click is enough)
- PINK the object serves as source
for the "stamp tool".
Click on (+) at the left of the track object to open it,
so you'll see its content.
(2) Move an object.
For that purpose, click simply on it and move the mouse. Test this function
with the objects from the "notes editor" and the « main
view ».
Remark: a double-click in an empty zone
unselects the active object.
As in the tutorial 1, please, create other notes with the " stamp
tool ". ![]()
Move notes again.
So you see clearly that the « note editor »
is only another representation of the red
framed object in the "main view".
Here are some options to use in the « note editor » when moving
an object:
Clic + mouse move: move the object.
[ SHIFT] + clic + moves: duplicate the object.
[ SHIFT] + rightclic + moves: create a virtual copy of the object (any
modifications on the original pass on all the virtual copies and vice
versa.)
(3) Visualization
By default the « note editor » show only
the sub-objects of the selected "track".
[Inside] button: (situated above the « notes editor
»)
Deactivates it and the "track" becomes visible.
Now move the "track" upward, the contained notes follow the
same movement !
You'll also notice that notes are transparent. Any transparent
"ghost" object is untouchable, you cannot move it nor
act on it when it is shown this way.
Here is an important point: all the groups have their own frequency
and amplitude. Sub-objects get parent properties in a relative way.
In the « notes editors » you'll also notice the presence of
a grey horizontal line, it's the zero point, the neutral point. For the
frequency, 0 = A4 (440hz). For the amplitude, 0 = 0 db. By default all
objects refer to zero, so it is only relative fluctuations to these initial
values.
By moving a note upward you'll notice that visible frequency curves in
the « graphic editor » also follow this displacement. (NB:
Depending needs it’s possible to deactivate this relative curve
display)
[X-Ray] button:
This option display note as dots. This simplify view allow a better management
of overlapping notes.
[+] [-] buttons change the information amout display
on objects
(4) Move - Modify - Duplicate -Delete
Let's study now some basic manipulations:
Move an object towards another one:
In the « main view », create at least tracks 2 containing
several notes.
Open the 2 tracks.
Select the [move] tool and click the object you wish
to displace (a note for example), then click the destination (a track
other than the one where's the note).
Please, begin again the operation with the destination track closed.
As the destination is opened or closed the source will go respectively
inside or outside.
Duplicate an object:
Select the tool [copy] then proceed as precedently for
[move].
Remark: a click on the right mouse button during the destination choice,
will create a virtual copy.
A virtual copy or also an instance, is only a reference to an object.
The instance content is identical to the original, it contains the same
objects, curves etc. So any modifications on one will pass on the other
one. A virtual object is recognizable by [V] situated on the object.
To delete an object, there're 2 methods:
1) Select the tool [delete] and click two time the object.
2) Position the cursor on the object and press the key [ del ] twice.
Important remark : an object can be delete ONLY if it isn't used by another
object, for example a cSound interface situated in the " soundpalette
" sheet can be erased only if notes using it are deleted first. It's
the same for the original of virtual objects.
(5) Modify the characteristics of an object:
Every object has it own attributes: name, size(format) of datum, coefficient,
etc....
The window "properties" displays details of all these parameters,
it is particularly useful because all this information isn't necessarily
shown or editable directly on an object.
In this window one click is enough to modify a parameter.